Task:
Deploy new application from a secured container image repository via OCP web console.
Steps:
1. Create the secret (if not already done):
- OCP Web Console (Home) --> Resources --> Secrets
- Create New Secret
- On the New Secret page, enter:
- Secret Type: Image Secret
- Authentication Type: Image Registry Credentials
- Hostname: <fqdn>/<namespace_or_userid_folder>/<image_stream_name>
- Email/Username: <user_id>
- Authorization/Password: <password>
- Click Create (button)
2. Navigate to the Deploy Image screen:
- OCP Web Console (Home) --> switch to Developer perspective
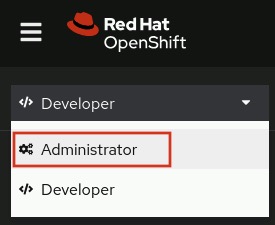
- Continue --> Projects

- Click the + icon (top toolbar) --> In the dropdown, click Container Images (dropdown option)
Notes:
The quick plus icon dropdown has three options:
- Import YAML file (which can also do JSON definitions)
- Import from Git repository (can build from source)
- Container images (container registries)
The Add to Project dropdown also has three options:
- Browse Catalog
- Deploy Image (same container registries option as the Container Images under the plus)
- Import YAML/JSON
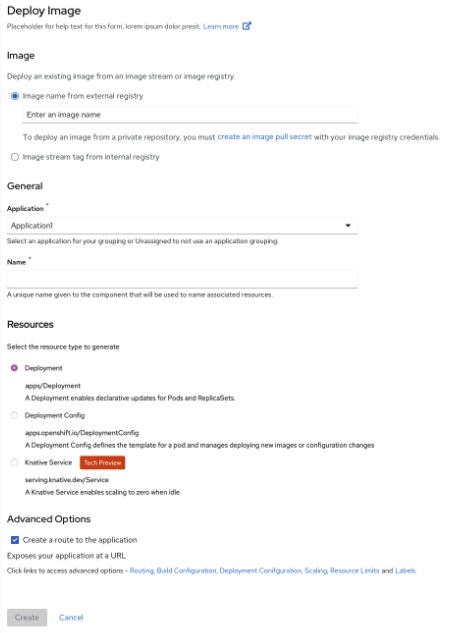
3. On the Deploy Image page, enter the following:
- Under Image (heading), Image name from external registry: <registry_fqdn>/<name_space_or_user_folder>/<image_stream_name>
- If this is a private registry, and you didn't create the secret yet, the pull secret can be created via the create an Image pull secret link in the text below the field above.
- Select the Pull Secret
- If the private registry has a self-cert or plain HTTP:
Allow Images from insecure registries: <checked if insecure>
- Application: <select_project_app_group_as_appropriate>
- Application Name: <enter_app_container_name>
- Under Resources, select: Deployment (radio button selection)
- Under Advanced Options, check Create a route to the application, and choose the URL to expose for the deployment.
- Click Create (button)
Note:
- If the repository has already been imported as part of imagestream tagging, then under Image (heading), instead of choosing the Image name from external registry option, choose Image stream tag from internal registry option.
4. After OCP automatically redirects you to the Topology page, verify the application pods are running.
Notes:
- When all pods are running, the circle around the app pod icon(s) will change from light blue to dark blue.
- Click the open URL icon (top right box icon with arrow) to confirm the route is working.
- Click the application icon (inside the blue circle) to view the Deployment details of the app and its three tabs: Details, Resources, and Observe.
previous page
|