Introduction
How to create a realistic eyeball in Cycles.
The eyeball is divided into three parts:
- Sclera
- Iris
- Pupil
There are two node trees, one for the sclera and one for the iris and pupil. This allows customization.
Blender Version:
Blender 4.1.1.
--------
STEPS
Open Blender
Delete auto-generated objects
Shift+A -> Mesh -> Sphere
Right-click -> Shade Smooth
Edit Mode -> Select all faces -> R+Y+90
Sphere now should have tips horizontal
Select first five rows of faces on Y-facing side -> drag out slightly to create cornea bulge
Go into X-ray view
Shift+D selected faces -> R+Z+180 -> drag to slightly behind surface of cornea bulge
Go to Properties -> Materials Tab
Create new Material -> name "eye-scelera"
Create new Material -> name "eye-pupil/iris"
With reverse cornea faces selected -> assign material "eye-pupil/iris"
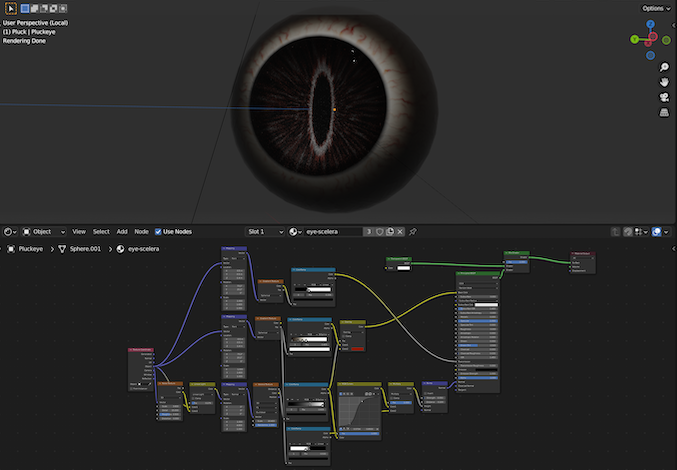
SCLERA MATERIAL NODE TREE
Mapping 1 thread is a mask that separates the cornea from the sclera. It allows the cornea to be transparent and reveal the iris/pupil.
Mapping 2 thread is the colors of the sclera. The colors in the ColorRamp depend on the user, but the first and last must be black and white, respectively.
Noise thread controls the veins on the sclera, which includes a mask so that the bump texture doesn't include the cornea, which must be smooth.
Open Node Editor
Shift+A:
Converter -> ColorRamp x4
Input -> Texture Coordinates
Vector -> Mapping x3
Vector -> Bump
Texture -> Noise
Texture -> Voronoi
Texture -> Gradient x2
Color -> MixRGB x3
Color -> RGBCurves
Shader -> Transparent
Shader -> Mix Shader
Texture Coordinate
Object Output -> Mapping 1 Vector input
Object Output -> Mapping 2 Vector input
Object Output -> Noise Texture Vector input
Object Output -> MixRGB Color1 input
Mapping 1
- Type = Point
- Location = X -0.5, Y -0.5, Z -1.4
- Rotation = X ~70, Y ~20, Z 0
- Scale = X 1, Y 1.6, Z 1
Output -> Gradient Texture 1 input
Mapping 2
- Type = Point
- Location = X -0.5, Y -0.5, Z -1.4
- Rotation = X ~70, Y ~20, Z 0
- Scale = X 1, Y 1.6, Z 1
Output to Gradient Texture 2 input
Noise Texture
- Dropdown = 3D
- Scale = 3.6
- Detail = 15
- Roughness = .500
- Distortion = 0
Color Output -> MixRGB 1 Color2 input
Gradient Texture
- Dropdown = Spherical
Color output -> ColorRamp 1 input
Gradient Texture 2
- Dropdown = Spherical
Factor output -> ColorRamp 2 input
Factor output -> ColorRamp 4 input
MixRGB 1
- Dropdown = Linear Light
- Factor = 0.179
Color output -> Mapping 3 Vector input
ColorRamp 1
- Black = 0.336
- White = 0.386
- Dropdown = Linear
Color output -> Principled BSDF Transmission input
ColorRamp 2
- Black = 0.0
- Color 1 = 0.175
- Color 2 = 0.294
- White = 0.405
- Dropdown = B-Spline
Color output -> MixRGB 2 Color1 input
Mapping 3
- Type = Normal
- Rotation = X 0, Y 0, Z 0
- Scale = X 1, Y 4.8, Z 1
Output -> Voronoi Texture Vector input
ColorRamp 3
- Black = .609
- White = .9
- Dropdown = B-Spline
Color output -> MixRGB 1 Factor input
Color output -> RGB Curves Color input
ColorRamp 4
- White = .425
- Black = .530
- Dropdown = Linear
Color output -> Mix RGB 3 Color2 input
Mix RGB 2
- Dropdown = Overlay
- Color2 = choose a color
Color output -> Principled BSDF Base Color input
RGB Curves
- Add two points to line and make an S shape
Color output -> MixRGB 3 Color1 input
Mix RGB 3
Dropdown = Multiply
Factor = 1
Color output -> Bump Height input
Bump
- Strength = 0.05
- Distance = .1
Normal output -> Principled BSDF Normal input
Transparent
Output -> Mix Shader upper Shader input
Principled BSDF
Output -> Mix Shader lower Shader input
Mix Shader
- Factor = 1
Material Output -> Output Surface input
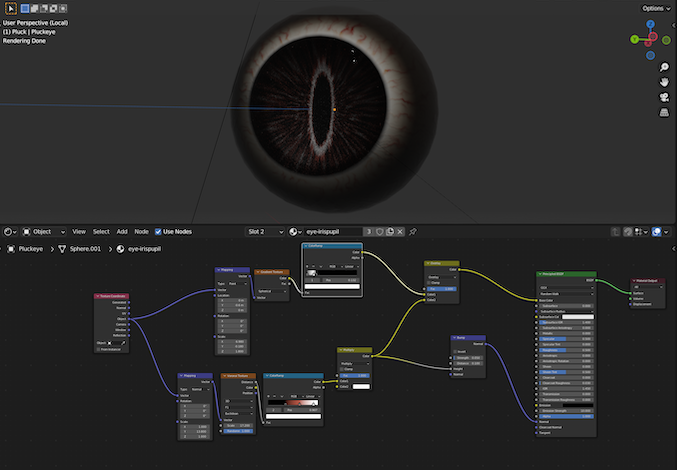
IRIS/PUPIL MATERIAL NODE TREE
Mapping 1 thread controls the pupil
Mapping 2 thread controls the iris
Shift+A:
Vector -> Mapping x2
Vector -> Bump
Texture -> Voronoi
Texture -> Gradient
Converter -> ColorRamp x2
Color -> MixRGB x2
Input -> Texture Coordinates
Texture Coordinates
Object output -> Mapping 1 Vector input
Object output -> Mapping 2 Vector input
Mapping 1
- Type = Point
- Location = X 0, Y -0.6, Z 0
- Rotation = X 0, Y 0, Z 0
- Scale = X 6.980, Y -0.180, Z 1.800
Output -> Gradient Texture input
Mapping 2
- Type = Normal
- Rotation = X 0, Y 0, Z 0
- Scale = X 1, Y 13.8, Z 1
Output -> Voronoi Texture Vector input
Gradient
- Dropdown = Spherical
Color output -> ColorRamp 1 input
Voronoi
- Dropdown = 3D
- Dropdown = F1
- Dropdown = Euclidean
- Scale = 17.2
- Random = 1
Distance output -> ColorRamp 2 input
ColorRamp 1
- Dropdown = Linear
- Color (pick one) = 0
- White = 0.132
- Black = .180
Color output to MixRGB Color1 input
ColorRamp2
- Color (pick one) = 0.341
- Color (pick one) = 0.624
- Color (pick one) = 0.907
Color output -> MixRGB 2 Color1 input
MixRGB 1
- Factor = 1
- Dropdown = Overlay
Output -> Principled BSDF Base Color input
MixRGB 2
- Factor = 1
- Dropdown = Multiply
Color output -> MixRGB Color2 input
Color output -> Bump Height input
Bump
- Strength = .050
- Distance = .1
Normal output -> Principled BSDF Normal input
Principled BSDF
Output -> Material Output Surface input
Finished Sclera Node Tree
Finished Pupil and Iris Node Tree
previous page
|